Advanced settings
eazyBI for Jira
eazyBI for Confluence
You can use eazyBI advanced settings to add support for additional Jira custom fields as well as change eazyBI reporting engine parameters.
It is recommended that you contact eazyBI support if you test the following example in the advanced settings and it didn't work as expected.
eazyBI advanced settings are defined using the TOML format.
Most of the changes described below require disabling and re-enabling the eazyBI plugin from the Jira system administration page.
On this page:
Additional custom fields
See the Advanced settings for custom fields page with a description of all advanced settings for custom fields.
Performance optimization and tuning
Increase query timeout
By default, there is 60 seconds query timeout after which report-generated queries will be canceled. The purpose of this timeout is to avoid too long execution of too complex ad-hoc queries (when you join too many dimensions in rows or columns).
If you have reports that fail the query timeout error and you need help optimizing these reports, then please export and send the report definition to eazyBI support.
If you still would like to increase this timeout value then add the following to the advanced settings text area field:
[mondrian.rolap]
queryTimeout = 120
In this example, the query timeout will be increased to 120 seconds.
You can increase the query timeout only if you are using the child process (which is recommended to reduce the impact of complex and long queries to the main Jira JVM process). A longer query timeout increases the memory usage of eazyBI. Consider allocating more memory to the eazyBI child process as well.
In eazyBI for Jira Cloud, you can increase the query timeout to a maximum of 180 seconds.
Increase concurrent report queries
The default number of max concurrent eazyBI report queries is 10. If more MDX queries are made simultaneously, then new queries will wait until the previous will finish.
If you have a powerful server with many CPU cores and you would like to allow more concurrent MDX queries then you can increase max queries value in eazyBI advanced settings with:
[mondrian.rolap]
maxQueryThreads = 20
In this example, the max value will be increased from 10 to 20. Or if you would like to reduce the number of concurrent MDX queries (to reduce the impact of slow queries on the overall Jira performance) then you can also reduce this setting.
You can increase the concurrent report queries only if you are using the child process.
We recommend keeping maxQueryThreads within reasonable limits because too many threads can lead heavy load on the server, especially if reports have complex calculations or long execution time. Increase maxQueryThreads in moderation.
Enable Mondrian to debug logging
If you would like to debug Mondrian MDX queries, that are generated by eazyBI or to see all executed SQL statements then you can enable Mondrian MDX and SQL logging with
[mondrian.log]
"mondrian" = "ERROR"
"mondrian.mdx" = "DEBUG"
"mondrian.sql" = "DEBUG"
You can see the Mondrian debug log in Jira home directory log/eazybi-mondrian.log file.
Enable Mondrian request profiling
If you want to investigate Mondrian MDX queries and executed SQL statements for individual reports, then you can enable Mondrian request profiling with
[mondrian.profiling]
enable = "system_admin"
You can specify which user role will be able to perform request profiling: system_admin (only Jira admins), admin (only eazyBI admins and system admins), owner (only account owners and system admins), reports_admin (only account report admins and system admins), user (any user who can create reports).
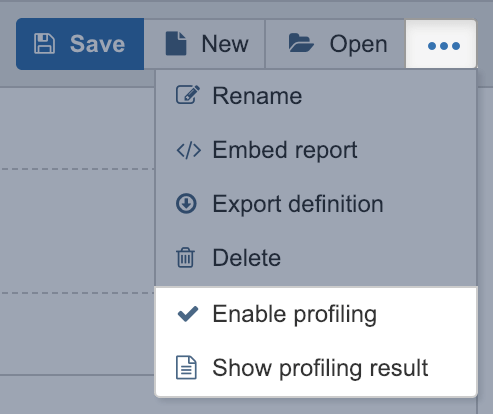
Then, go to the Analyze tab and Enable profiling in the other report actions to the dropdown. After that, every next request execution will be profiled and you can view the last profiling result with Show profiling result.
Please send the report definition and profiling result to eazyBI support if you need help with report performance optimization.
Background job queues
There are several background job queues in eazyBI:
- regular_import – for source application imports that are scheduled at a regular frequency.
- application_import – for source application imports that are started manually.
- file_import – for uploaded source file imports.
- dashboard_email – sending emails for dashboard email subscriptions.
You can see the status of background job queues from the eazyBI System administration / Background jobs page. If needed, you can modify the job_queue settings.
By default, one parallel background job can be executed in each queue. If you would like to increase the size of the queue, then specify the size setting for this queue, for example:
[job_queue.application_import]
size = 2
If you would like to limit that no background jobs are executed during some hours (e.g. during high load hours of Jira) then specify either disabled_hours or enabled_hours the setting, for example:
[job_queue.application_import]
disabled_hours = "9-18"
or
[job_queue.application_import]
enabled_hours = "0-9,18-24"
In both cases, manual data imports will not be done from 9:00 to 18:00 (using the Jira server time zone).
If you change disabled_hours or enabled_hours , then it will be checked every 10 minutes.
If you encounter "Was waiting on import too long time" error in your data imports, it means that the import job was waiting in the queue for more than 1 hour. This can be solved either by configuring eazyBI to run more concurrent imports or not running as many concurrent imports. If this happens regularly, you can fix it the following ways.
a) If this happpens for both manual and regular imports - increase the queue size if the available server resources allow it. An example for regular imports:
[job_queue.regular_import]
size = 2
b) If this happens only for regular imports, schedule them so that they do not overlap in time.
For advanced Data Center deployments, you can separate report execution from background job processing by adding:
[job_queue]
separate_nodes = true
See Dedicated nodes for Data Center for detailed configuration.
Dedicated nodes for data import jobs is available since eazyBI version 8.2.
Set minimum regular import frequency
Too frequent source data imports can impact eazyBI and Jira performance. You can change the minimum allowed regular import frequency from the default 10 minutes to a larger time interval.
[source_application]
min_regular_import_frequency = "1 day"
This option will set the minimum allowed regular import frequency selection for all accounts. The parameter will not override saved regular import frequencies.
If you would like to enable more frequent import options in some specific accounts, you can enable plan parameters for all accounts and then specify minimum regular import frequency for specific accounts.
1) In eazyBI advanced settings, add a parameter to enable plan parameters for individual accounts:
[admin]
account_plan_params = true
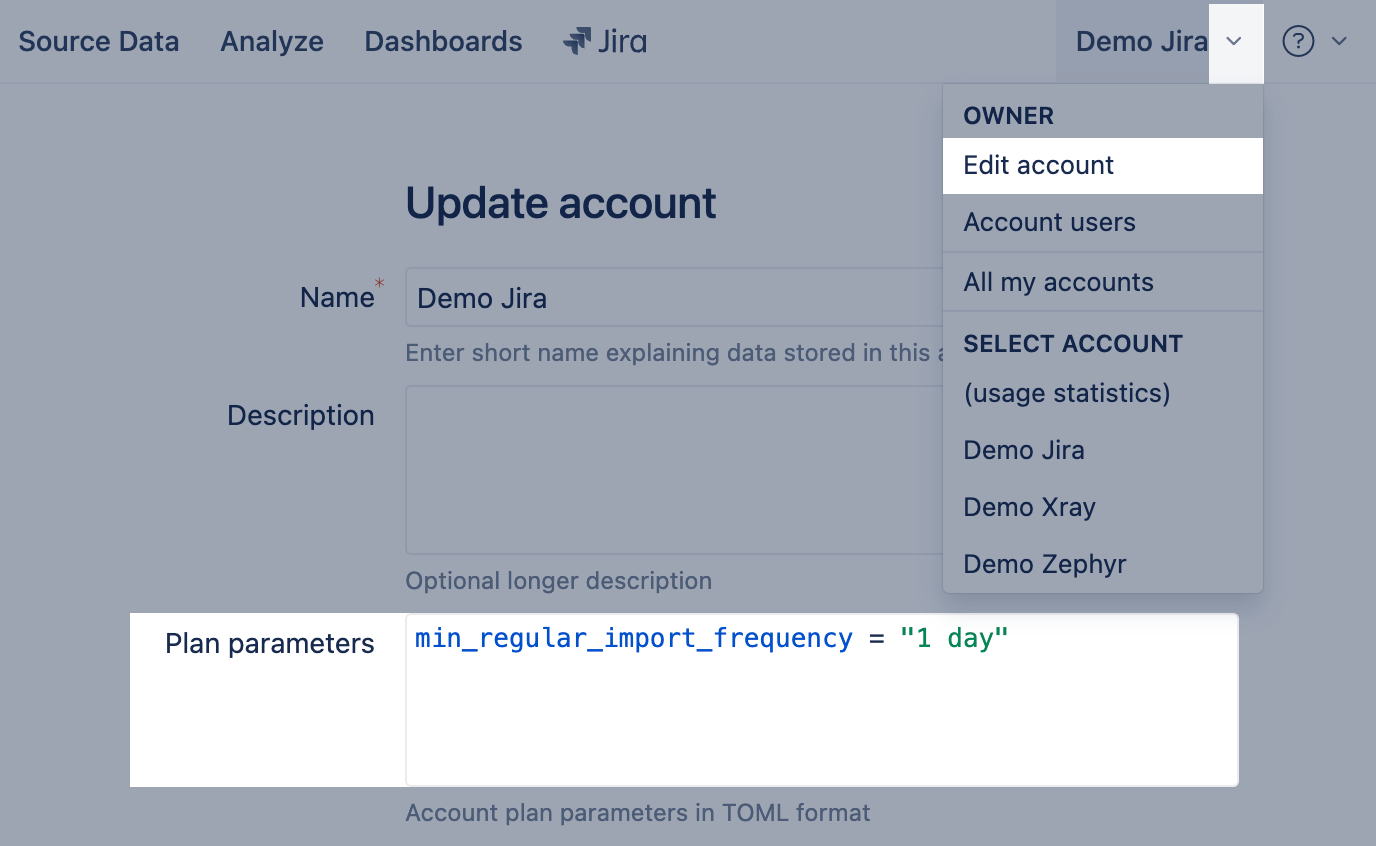
2) Open an account where you want to limit the minimum regular import frequency and select Edit account from the top navigation menu. Set import frequency in Plan parameters for this account:
min_regular_import_frequency = "1 day"
Enable Import profiling logging
If you would like to monitor import process performance and see how much time takes each subprocess there, you could enable Import profiling.
[jira.profiling]
enable = true
You could see details how long import and each import subprocess run in Jira home directory log/eazybi-queues.log files.
Enable warnings about surrounding white space trimming
If a custom field value ends with white space, it is not visible in the eazyBI dimension member and can cause a hard-to-trace data mismatch. eazyBI removes these surrounding white spaces for custom field values during Jira data import and writes in the log file which customfield and which value was adjusted. Still, if you wish to organize your data and remove the white space in the source, you can enable an import warning message about trimmed white spaces:
[jira]
surrounding_whitespace_warning = true
Disable Confluence Task import
If you do not wish to analyze Confluence tasks or they fail during import and you wish to disable the task import until the root cause is resolved, you can do this with the following advanced setting:
[confluence]
import_page_tasks = false
After applying the setting, make sure to re-import all data.
Restrict Confluence page views import
If you do not wish to import all page views for confluence pages, add the advanced settings for page_views_history to enable or restrict confluence page views history import:
[confluence.page_views_history]
enable = true
Local REST API requests
If it is not possible to configure your Jira server to enable local REST API requests then these local REST API calls during Jira issues import can be disabled with
[local_rest_api]
disabled = true
If it is necessary to use a different Jira base URL for local REST API requests (e.g. specify localhost and corresponding port number) then specify this local REST API base URL:
[local_rest_api]
base_url = "http://localhost:8080"
trusted_base_url = "http://localhost:8080"
Export to PDF using Google Chrome
See Export to the PDF documentation page.
Additional locales
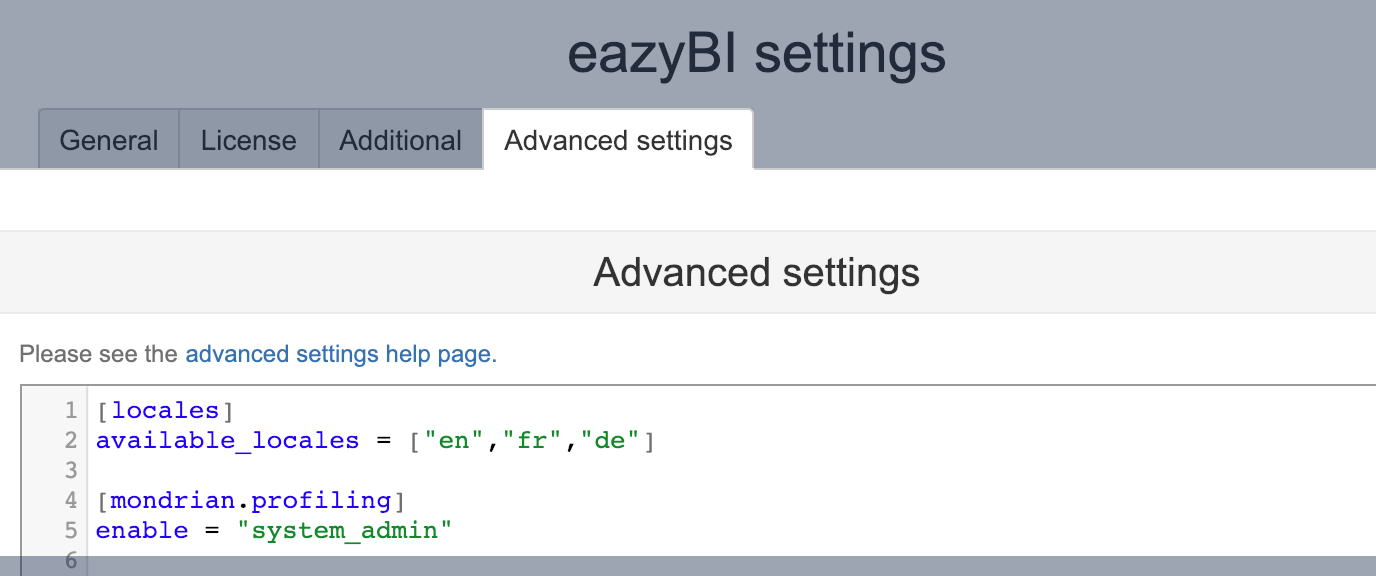
System administrators can enable additional user interface languages (locales). Currently, French, German and Latvian locales are included in addition to the default English locale. The additional locales can be enabled with:
[locales]
available_locales = ["en", "fr", "de"]
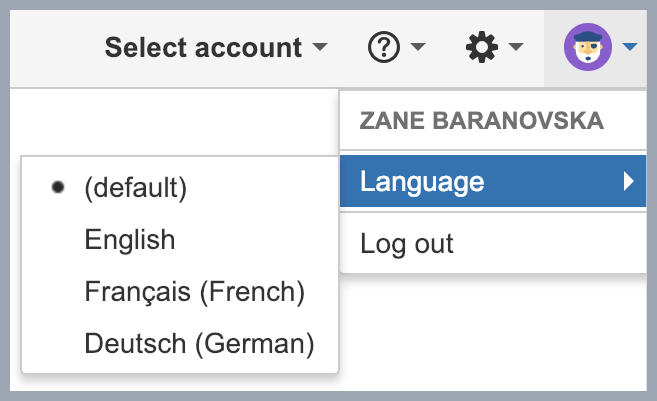
When additional locales are added then users will be able to select a different language from the top navigation.
If you would like to change the default locale from English to a different language then add in the locales section, for example:
default_locale = "fr"
If you need help maintaining additional eazyBI user interface languages, then please contact eazyBI support.
Enable incremental data import for User and Report admin roles
Incremental data import option for the Report admin and the User roles available on Cloud, and since eazyBI version 8.2
By default, the Source Data is available only to the account Owner, Data admin, and User admins who can edit the import options. You can also allow people with the Report admin and User roles to access the Source Data section, enabling them to manually initiate incremental data imports without access to edit import options. Add the following settings to enable the functionality:
[account_users]
start_data_import = true
When the settings are applied, the new checkbox Can start data import is available in the Account users screen for users and user groups with the Report admin and User roles. By default, the checkbox is not marked.
Enable Comic Style charts
If you want to enable users to switch to funny comic-style charts, then add add setting comic_style .
[ui.comic_style]
enable = true
# If needed, uncomment to make it default for all users.
# default = true
SSRF protection
SSRF (Server Side Request Forgery) protection allows preventing eazyBI REST API and SQL import from other hosts in the same local network where the Jira server is running. By default SSRF protection is disabled.
Enable SSRF protection with:
[ssrf_filter]
enable = true
If you would like to allow REST API import or SQL import access to some IP addresses in the same local network, then specify allowed_ip_addresses. In addition, you can specify restricted_ip_addresses with additional IP addresses (which are not in the local network) from which REST API import and SQL import should be restricted.
[ssrf_filter]
enable = true
allowed_ip_addresses = ["192.168.1.1", "192.168.8.1"]
restricted_ip_addresses = ["8.8.8.8", "8.8.4.4"]
In addition to this, you can use your own external proxy and then allow/restrict IP addresses in the proxy configuration. The proxy will only work for REST API import, not for SQL import.
[ssrf_filter]
enable = true
proxy = "127.0.0.1:3128"
Limiting file upload
Specifying what file extensions and content types are allowed to upload as data source files is possible. Settings like this allow only csv and Excel file upload:
[source_file]
allow_content_types = ["text/plain", "application/vnd.openxmlformats-officedocument.spreadsheetml.sheet"]
allow_extensions = ["csv", "xlsx"]
Additional source applications
You can add authentication keys for Google Sheets, Harvest, FreshBooks, and Freshdesk source applications to enable data import from these sources. After adding authentication keys as described below these source applications will be available in Source Data tab when adding a new source application.
If you need to add additional source applications in eazyBI for Jira Cloud, add only the following advanced settings and list the additional application types, for example:
[source_application]
application_types = [
 "harvest", "highrise", "zendesk", "freshdesk"
]
To add additional source applications in eazyBI for Jira Datacenter add the following advanced settings
REST API
REST API additional source application is available by default, but you can change default configuration parameters through advanced settings.
If the REST API needs longer to return the result, you can change the default timeout parameter for rest_api from 60 seconds to, e.g., 120 seconds:
[source_application.rest_api]
api_timeout_in_seconds = 120
SQL Source
If you import data from a SQL source, you can increase the timeout with the following settings:
[source_application.sql]
connect_timeout = 20
read_timeout = 600
query_timeout = 600
Google Sheets
- Create a project (or use existing project) at https://console.developers.google.com.
- In the Library section enable Google Drive API and Google Sheets API.
- In the OAuth consent screen under Scopes for Google APIs select "../auth/drive.file " and "../auth/spreadsheets.readonly " scopes.
- In the Credentials section create a new Client ID for web application and
- In Authorized JavaScript Origins enter your JIRA server Base URL
- in Authorized Redirect URI enter
JIRA_BASE_URL/plugins/servlet/eazybi/source_applications/auth/google_spreadsheets/callback(substituteJIRA_BASE_URLwith your Jira server Base URL)
In eazyBI advanced settings specify Client ID and Client secret that were created by Google:
[source_application.google_spreadsheets]
client_id = "..."
client_secret = "..."
Harvest
The integration currently works only with supported MySQL and PostgreSQL databases.
- In Harvest Account settings / Integrations click on OAuth2 Clients.
- Create a new client and in Redirect URI enter
JIRA_BASE_URL/plugins/servlet/eazybi/source_applications/auth(substituteJIRA_BASE_URLwith your Jira server Base URL). - In eazyBI advanced settings specify Client ID and Client secret that was created by Harvest:
[source_application.harvest]
client_id = "..."
client_secret = "..."
Freshbooks
- Register as a FreshBooks OAuth consumer.
- In eazyBI advanced settings specify the OAuth consumer key (the portion of your account domain before freshbooks.com) and the generated consumer secret:
[source_application.freshbooks]
consumer_key = "..."
consumer_secret = "..."
Freshdesk
In eazyBI advanced settings enable Freshdesk source application:
[source_application.freshdesk]
Zendesk
In eazyBI advanced settings enable Zendesk source application:
[source_application.zendesk]


